How to Install Ark Survival Evolved Dedicated Server using Ark Server Manager
Dedicated Server Managers, Handle the Management.
Dedicated server managers are easy to have a love hate relationship with. On the one hand they seem extremely overwhelming especially if you are new and don’t really even understand what is going on or what you are looking at. It appears at first glance you just have a million places to break things. Once you start to install a few game servers and see that they are not really that complicated, you can really appreciate a manager like Ark Server Manager. They essentially simplify the process, that is once you understand it.
We assume you have already read the in’s and out’s of running your own server, things like the monthly costs, the hardware, and leaving your computer up 24/7. If you have not I recommend starting with this quick read, It can save you hours of time and frustration.
You can also host this game from GPortal, Paying for hosting has advantages and disadvantages, you can read about those HERE. IF you decide to use paid hosting, friends of the site get 10% off and it helps support me.

How to Install Ark Server Manager
I have found yet another server manager, This one is for Ark Survival Evolved. I did not create this manager, however, whenever I find an excellent resource that will help my fellow survivors I try to get the information out there. If you have trouble with this program or have questions you can contact the developer and seek help on the forums, and as always I will help in my discord channel when I am available.
Here is a link to the owners Website
Ark Survival Evolved Manager Prerequisites
- Operating System: Your system must be running on a 64-bit Windows operating system. This is essential for the proper functioning of the Ark Survival Evolved Manager.
- .NET Framework 4.6.2 or Higher: The .NET Framework 4.6.2 or a more recent version must be installed on your system. If it’s not already installed, you can download and install it from the provided link: Download Here
- Internet Access: An active internet connection is required for various functionalities of Ark Survival Evolved Server Manager, including downloading updates and accessing online resources.
Step 1 Download and Install the Files.
Download the file, the file is a zip file so you will need a program to unzip it unless you are using windows 11, which has a built in zip program (finally).
You can find Ark Survival Evolved Download Here On the creators webpage.
You can choose a Zip or EXE file.
Step 2 Install the Files
Once you have downloaded the files, you will have to unzip them and run the .exe or simply run the .exe.
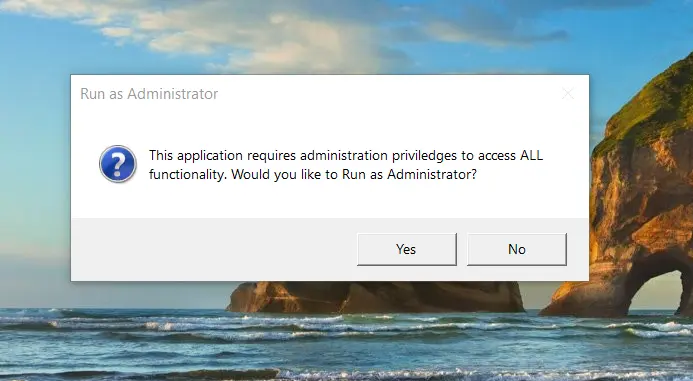
You must run this program as an administrator.
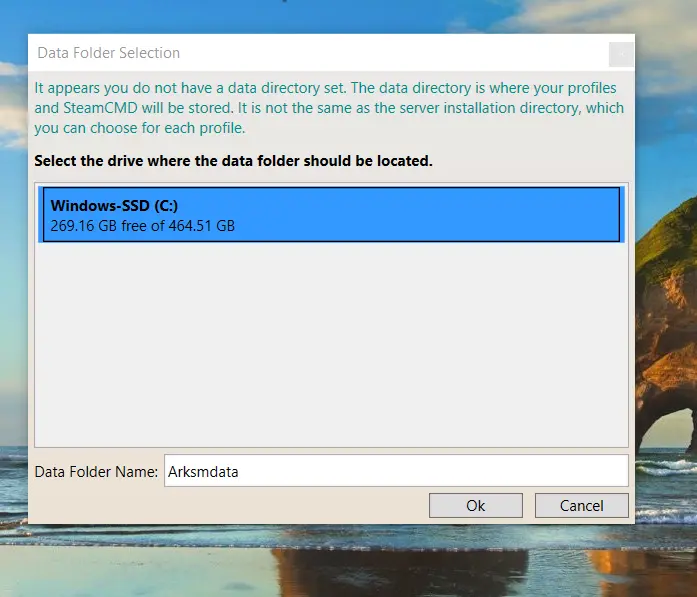
Choose the install drive, name and Location and Click Okay, and simply follow the onscreen prompts.
- asm will install and close and you will need to restart it
Step 3 Restart the Manager
Restart the Ark Server Manager and Click the green plus button on the upper left.
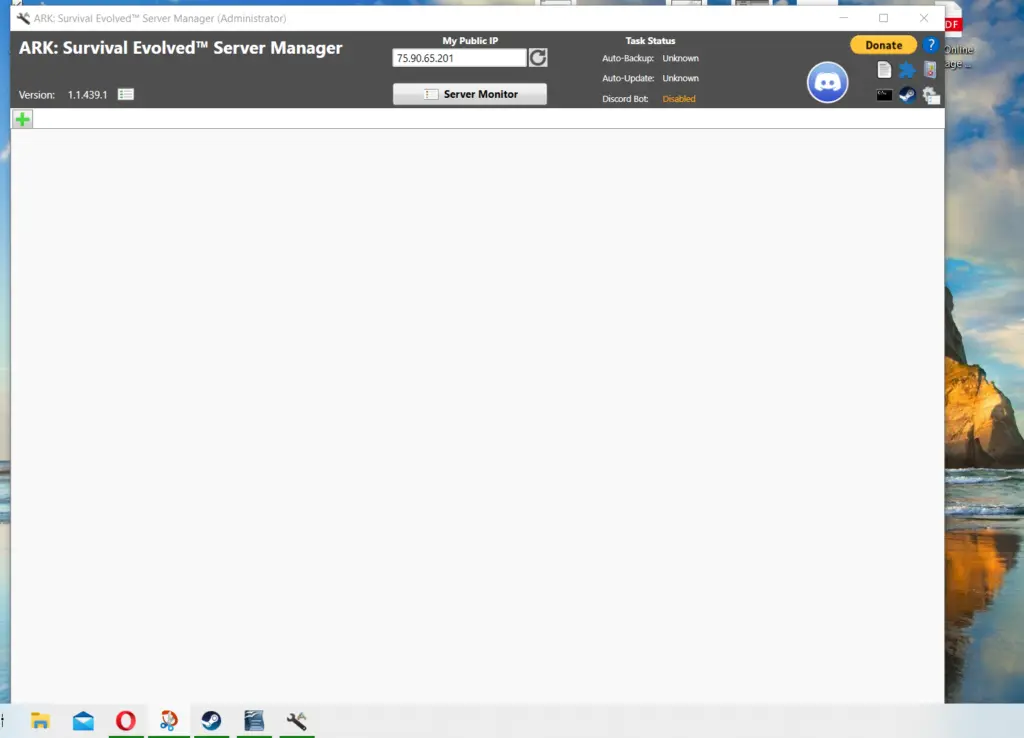
Step 4 Name the Profile and Get Webapi
Name the profile, I find it best to use the map name here, as you will later be able to link maps together and travel freely throughout Ark’s worlds.
Set Location, simply where you want the ark files to be located, I use the default.
Note: the installed version currently shows 0.0 because at this point you have simply installed the manager and have not actually installed the server files yet. Clicking the Install button installs ark files via steam.
You will also need to click the gear icon on the right hand side of the screen. It will open, allowing you to enter the steam API, simply click on get API and it will open a steam window for you, log in and it will retrieve your api, copy and paste it. This window has no save function.
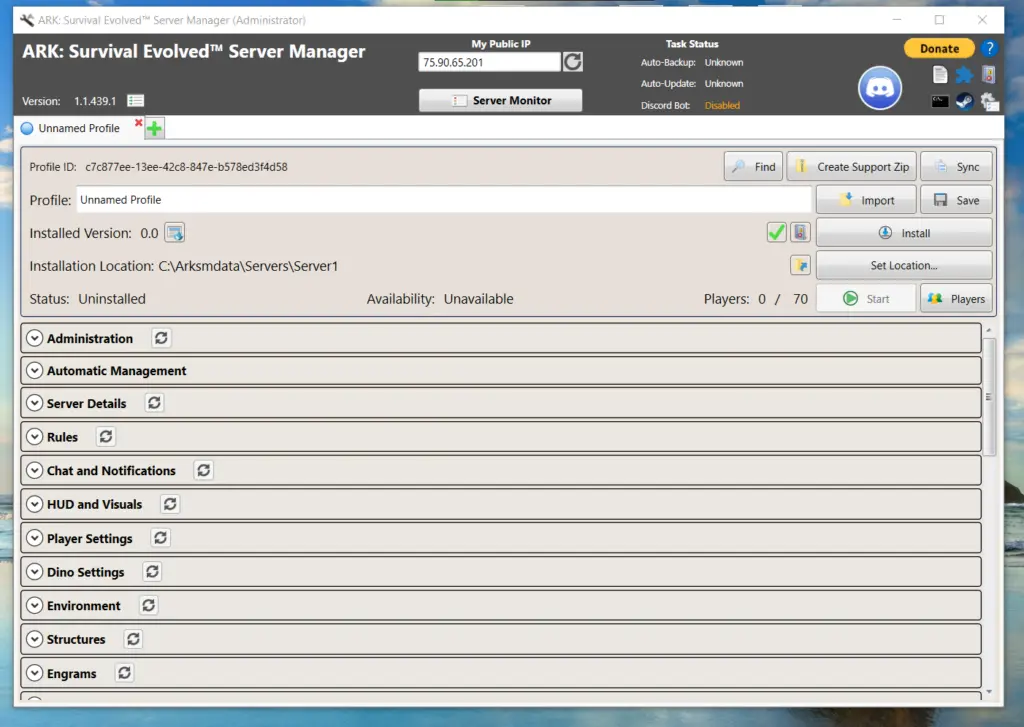
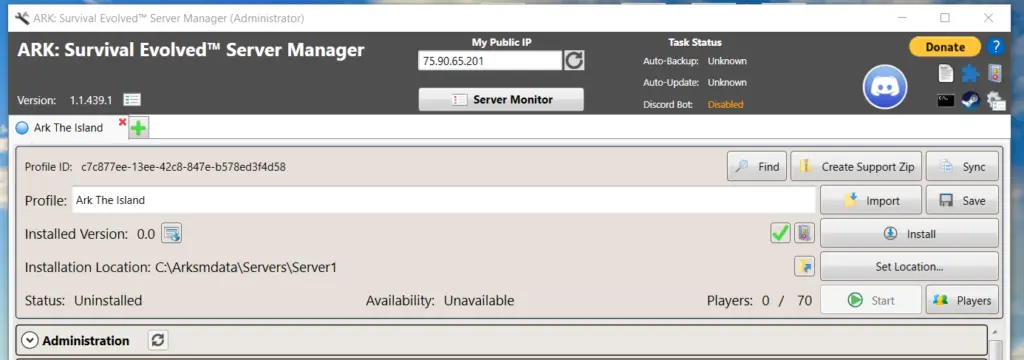
Step 5 Install
After Clicking install you will get the following download screen, until the server files are fully downloaded.
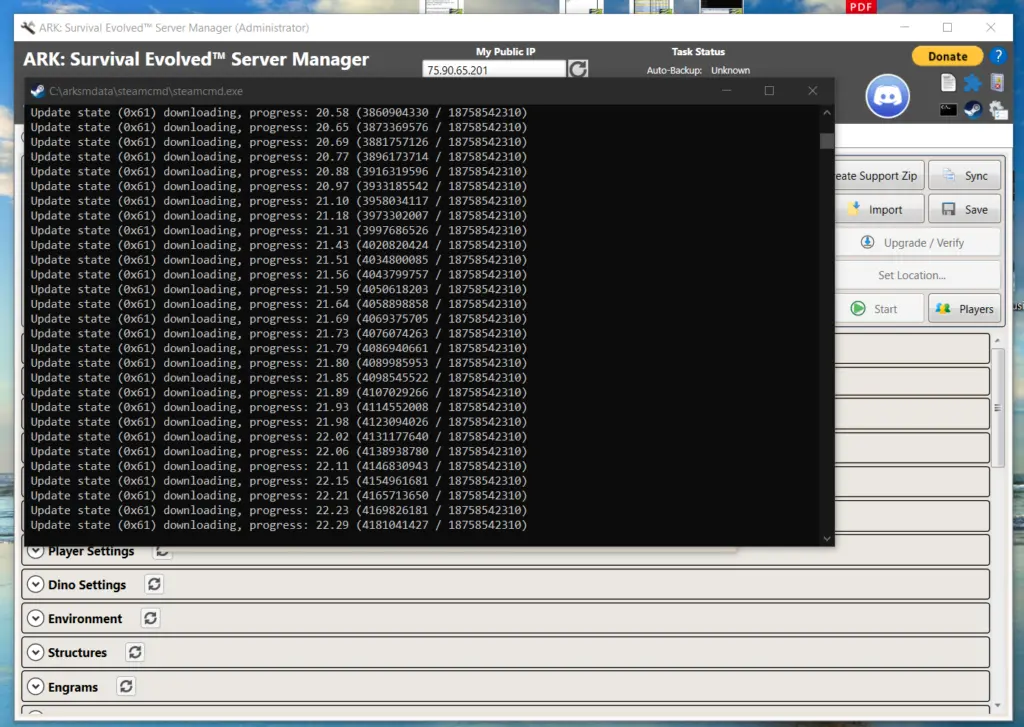
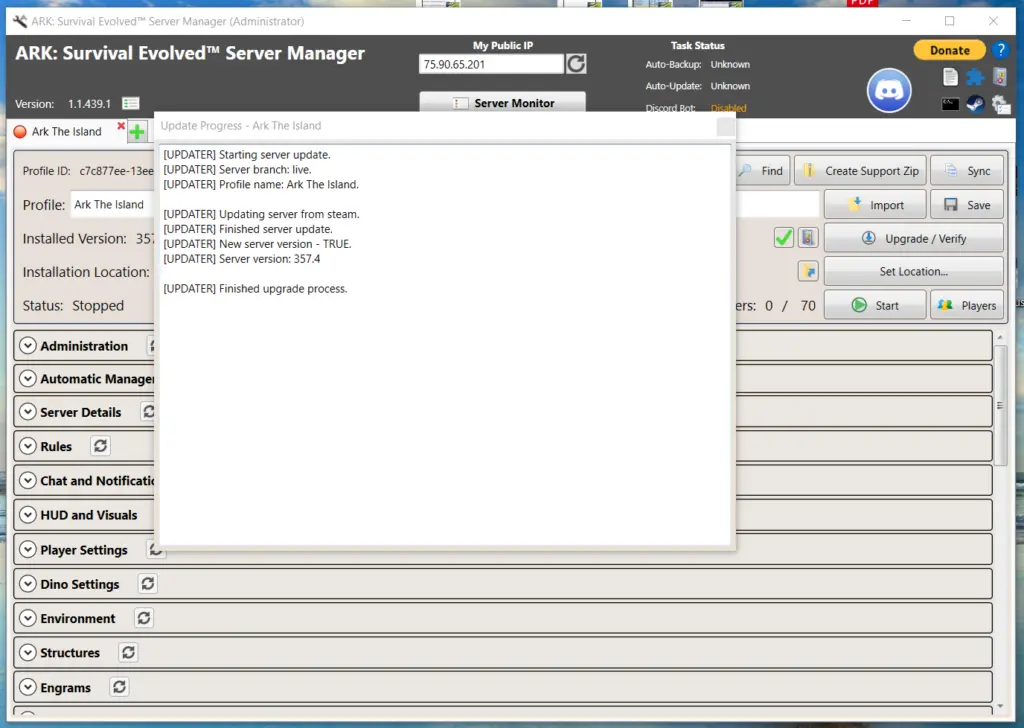
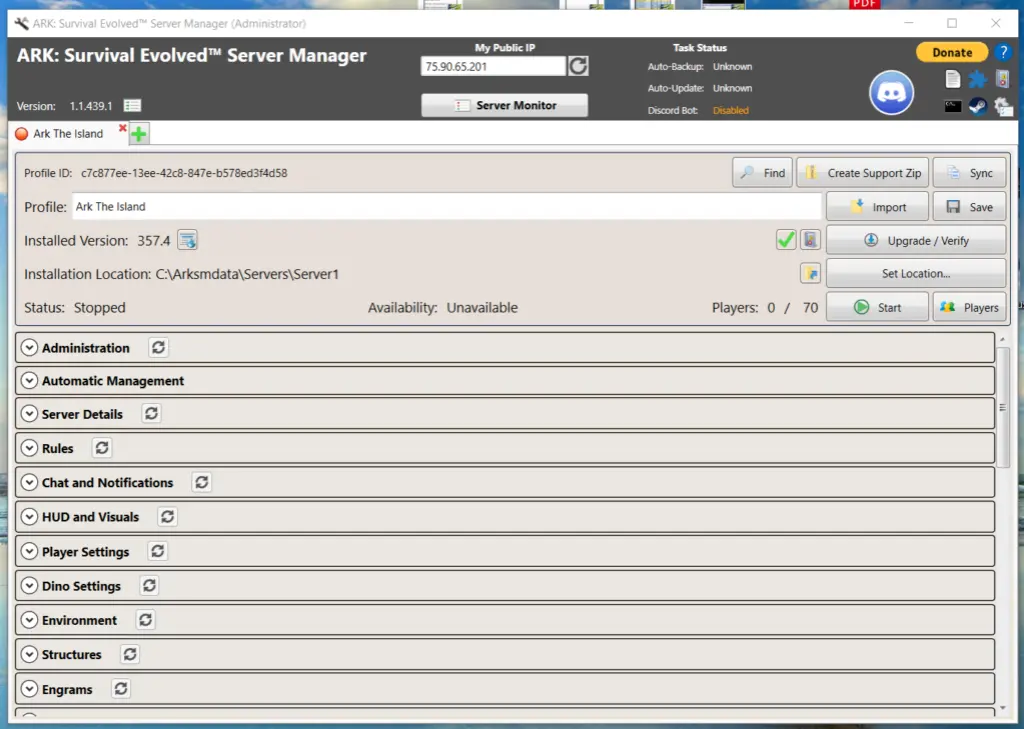
Now you will have the Installed game version listed in this case 357.4
Step 6 Set Your Ports
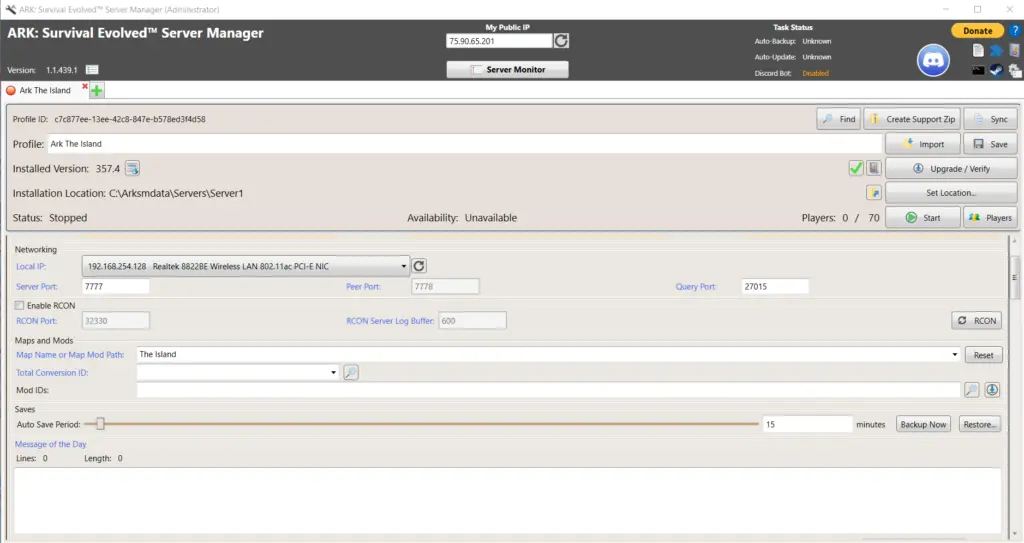
Now we will need to get the server administration setup. This would normally be the hard part, but Ark Server Manager makes it very easy.
The server manager already has the correct ports listed you will need to go into your router and allow the server IP to use the ports.
You will need to open ports in your router. I open a range of ports because with every map release you will need more ports if you want to run more than one map at the same time. This is an easy way to transport tames and items from one map to another.
Port Ranges
- 7775-7800
- 27015-27030
If you don’t know how to forward ports in your router, this page should have everything you need. It is normally easy to do once you have a general understanding of what you are trying to accomplish and if you have the username and password to the router. See how to open ports HERE for more help.
Step 7 Map Selection
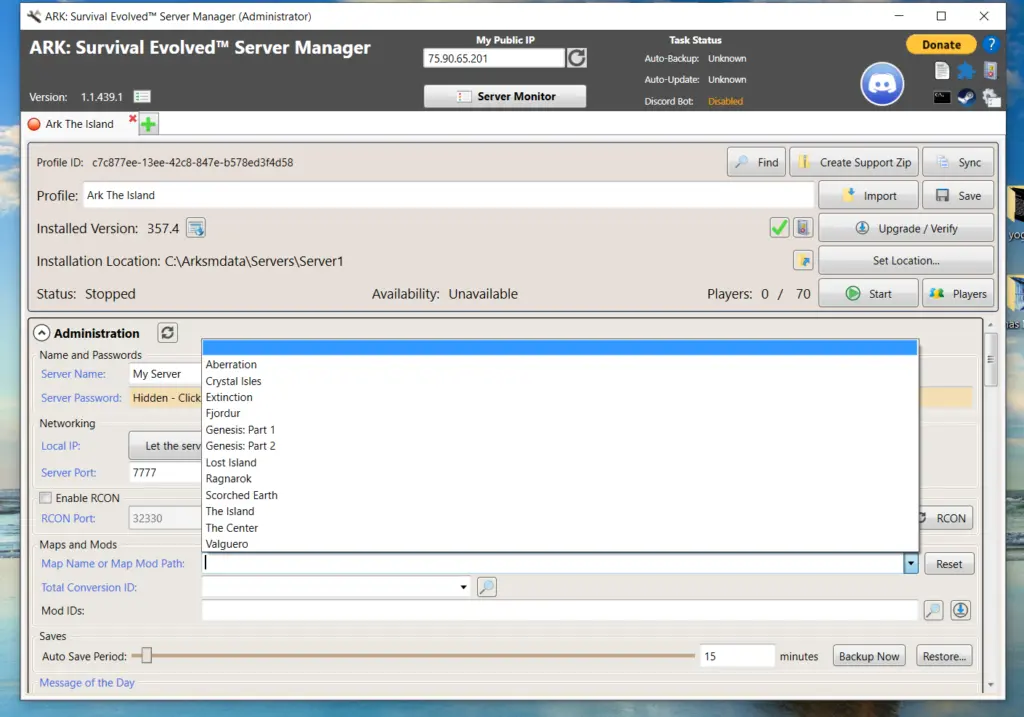
Now that you have your ports forwarded and have setup a dynamic ip, you simply need to select a map, and hit the start button. Depending on the computer it can take a very long time to start your server the first time, even upwards of 20 minutes, Mine took 7 minutes the first time which felt like a lifetime. You will get a message on the screen that the server has started so until you see that just keep waiting.
Issues
When you start your game in the bottom left of the screen sort the servers by lan and your server will show up, if it doesn’t show and it states its running, I always start with a shutdown of the server and a restart. Servers of any kind can be very goofy. If the server doesn’t show after a second startup check your port forwarding first, that is the most common issue.
When that doesn’t solve the problem start at the top of this page, go slow and make sure you didn’t miss any steps, and also check Arkservermanager.
MESS WITH STUFF!
One of the best things about the ASA Dedicated Server Manager is all the normal adjustments you want to make are broken out really nice in catergories under Game and GameUserSettings. You will need to look around a bit still but its very easy to make changes – just don’t forget to hit save. I have listed just a few settings below to give you an idea of where to find things.
Common things to change
- XPMultiplier=1.000000
- TamingSpeedMultiplier=1.000000
- HarvestAmountMultiplier=1.000000
- bUseCorpseLocator=False
Game.ini
[ServerSettings]
DifficultyOffset=0.000000
NewMaxStructuresInRange=6000.000000
DayCycleSpeedScale=1.000000
DayTimeSpeedScale=1.000000
NightTimeSpeedScale=1.000000
DinoDamageMultiplier=1.000000
PlayerDamageMultiplier=1.000000
StructureDamageMultiplier=1.000000
PlayerResistanceMultiplier=1.000000
DinoResistanceMultiplier=1.000000
StructureResistanceMultiplier=1.000000
XPMultiplier=1.000000
TamingSpeedMultiplier=1.000000
HarvestAmountMultiplier=1.000000
PlayerCharacterWaterDrainMultiplier=1.000000
PlayerCharacterFoodDrainMultiplier=1.000000
DinoCharacterFoodDrainMultiplier=1.000000
PlayerCharacterStaminaDrainMultiplier=1.000000
DinoCharacterStaminaDrainMultiplier=1.000000
PlayerCharacterHealthRecoveryMultiplier=1.000000
DinoCharacterHealthRecoveryMultiplier=1.000000
DinoCountMultiplier=1.000000
HarvestHealthMultiplier=1.000000
PvEStructureDecayPeriodMultiplier=1.000000
ResourcesRespawnPeriodMultiplier=1.000000
GameUserSettings.ini
[/script/shootergame.shootergamemode]
MaxTribeLogs=400
bDisableFriendlyFire=False
bPvEDisableFriendlyFire=False
bDisableLootCrates=False
bIncreasePvPRespawnInterval=False
bAutoPvETimer=False
MaxNumberOfPlayersInTribe=70
MaxAlliancesPerTribe=10
MaxTribesPerAlliance=10
bPvEAllowTribeWar=True
bPvEAllowTribeWarCancel=False
bAllowCustomRecipes=True
bUseCorpseLocator=False
bAllowUnlimitedRespecs=False
bAllowPlatformSaddleMultiFloors=False
GlobalPoweredBatteryDurabilityDecreasePerSecond=3.000000
bDisableGenesisMissions=False
bDisableDefaultMapItemSets=False
bDisableWorldBuffs=False
bEnableWorldBuffScaling=False
AdjustableMutagenSpawnDelayMultiplier=1.000000
BaseHexagonRewardMultiplier=1.000000
HexagonCostMultiplier=1.000000
DinoHarvestingDamageMultiplier=3.200000
bUseDinoLevelUpAnimations=True
bAllowUnclaimDinos=True
StructureDamageRepairCooldown=180
PvPZoneStructureDamageMultiplier=6.000000
bPassiveDefensesDamageRiderlessDinos=False
bDisableStructurePlacementCollision=False
bLimitTurretsInRange=False
bHardLimitTurretsInRange=False
bIgnoreStructuresPreventionVolumes=False
bGenesisUseStructuresPreventionVolumes=False
Read These First
WindowsGSM
Troubleshooting
You can also host this game from GPortal, Paying for hosting has advantages and disadvantages, you can read about those HERE. IF you decide to use paid hosting, friends of the site get 10% off and it helps support me.

