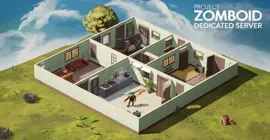
How to Host a Project Zomboid Dedicated Server
Welcome to our guide on setting up a Project Zomboid dedicated server, whether you are looking to set up a server for your own personal use or a Project Zomboid dedicated server for a larger community to enjoy. Playing multiplayer games on a self-hosted or dedicated server offers players a unique and customizable gaming experience. By setting up their own server, players have the freedom to create their own rules, mods, and gameplay options, leading to a more personalized and immersive gaming experience. By following our step-by-step instructions, you will be able to quickly and easily set up your own Project Zomboid self hosted server and start playing with friends or fellow gamers in no time. So, let’s get started and create the ultimate gaming experience with your very own Project Zomboid server!
We assume you have already read the in’s and out’s of running your own server, things like the monthly costs, the hardware, and leaving your computer up 24/7. If you have not I recommend starting with this quick read, It can save you hours of time and frustration. I also assume you have already installed WindowsGSM, but if you haven’t start with that HERE.
You can also host this game from GPortal, Paying for hosting has advantages and disadvantages, you can read about those HERE. IF you decide to use paid hosting, friends of the site get 10% off and it helps support me.
Step 1 Find the Server Instructions
First you need to find your server instructions. Some of the server instructions are built into WindowsGSM and do not require a plugin. Since new games are released all the time many games are not built into WindowsGSM and do require a plugin. The plugin is simply instructions for WindowsGSM to find the server on Steam and install the server inside of WindowsGSM. There are dozens of server plugins that are available for your use, If it is a brand new game you can request a plugin in WindowsGSM Discord. You can find a list of all the dedicated server plugins quite easy on the WindowsGSM website. All of the plugins on that site link out to GitHub. But Alas, I have a direct link to the plugin download just for you!
Download the Project Zomboid Plugin. Click on the green get code button and download the Zip file.
Download Note++
Step 2 Install the Plugin
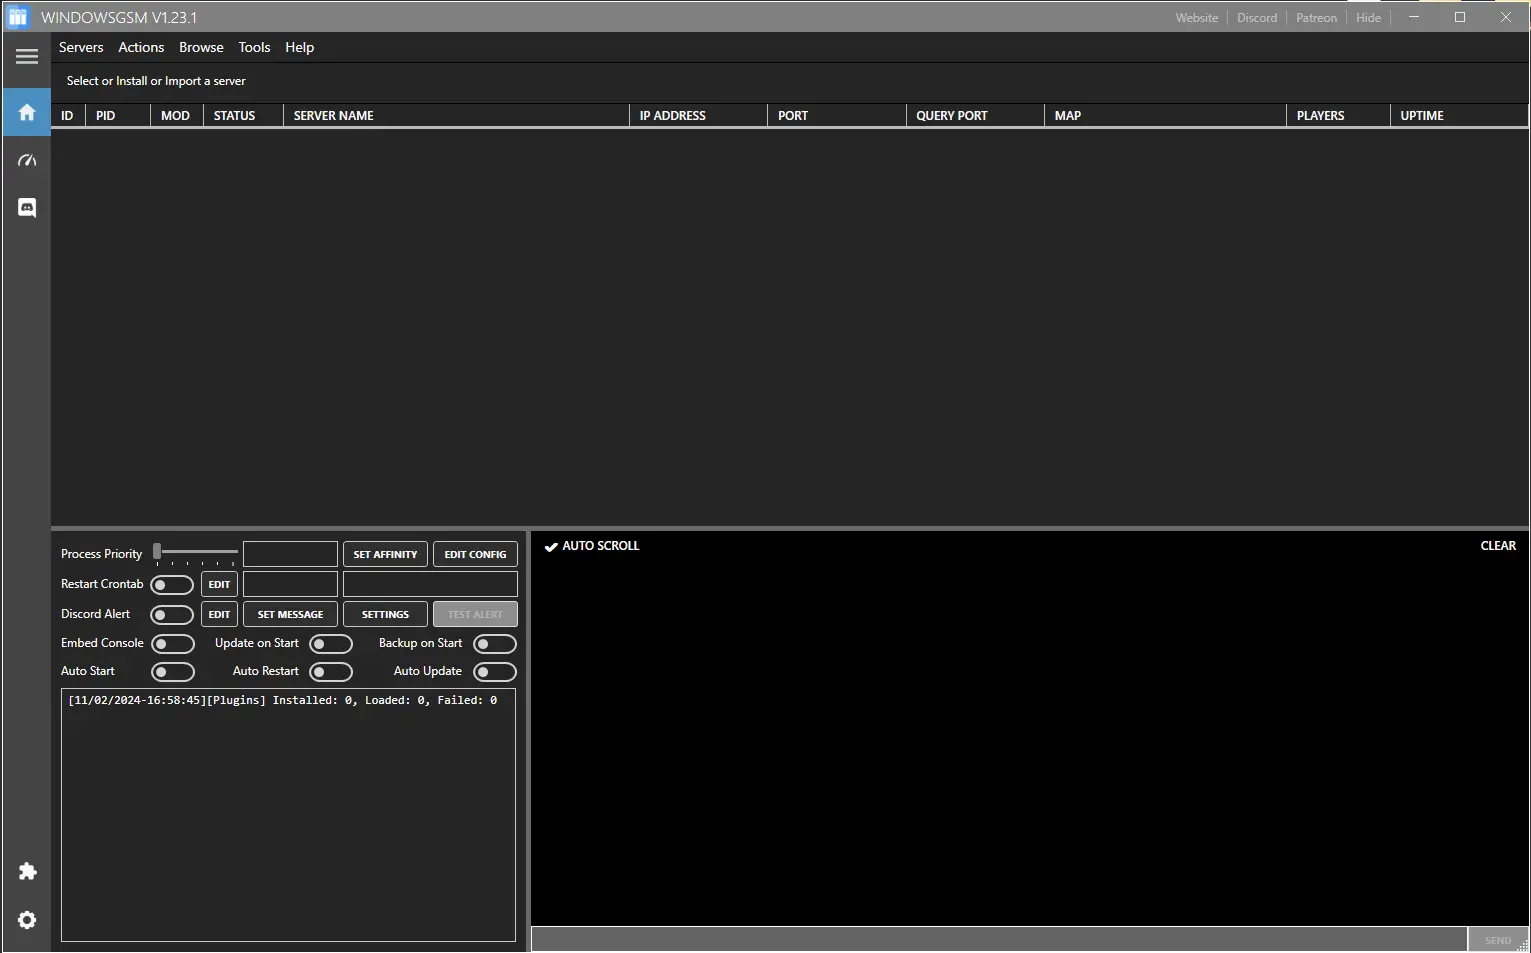
In this case a plugin is required and now that we downloaded it we have to insert it into the WindowsGSM program.
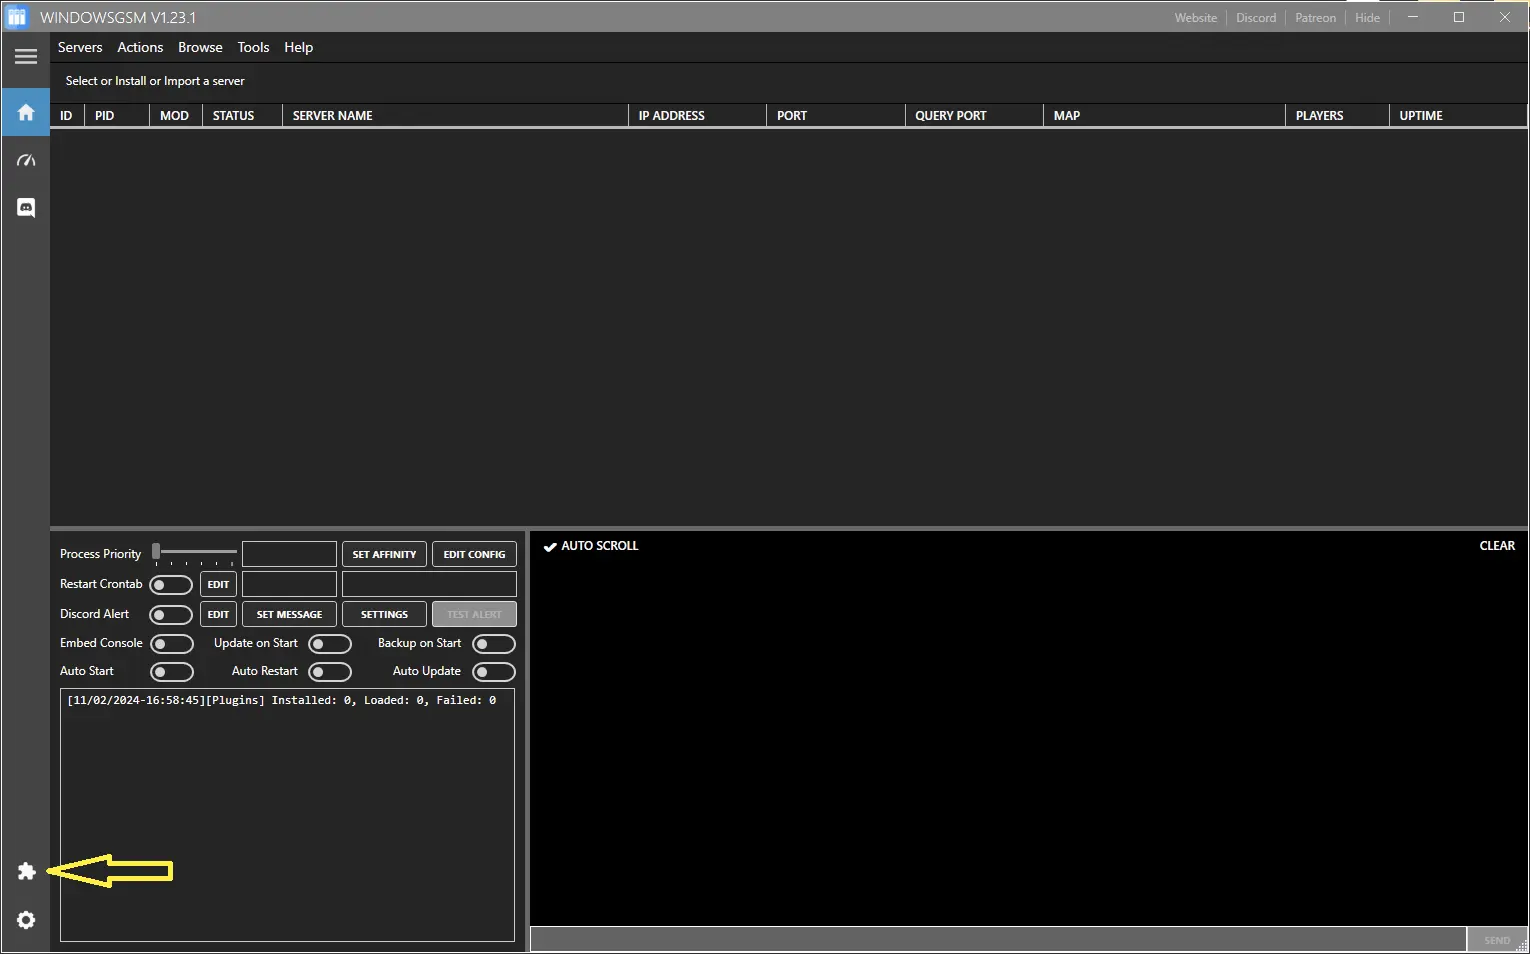
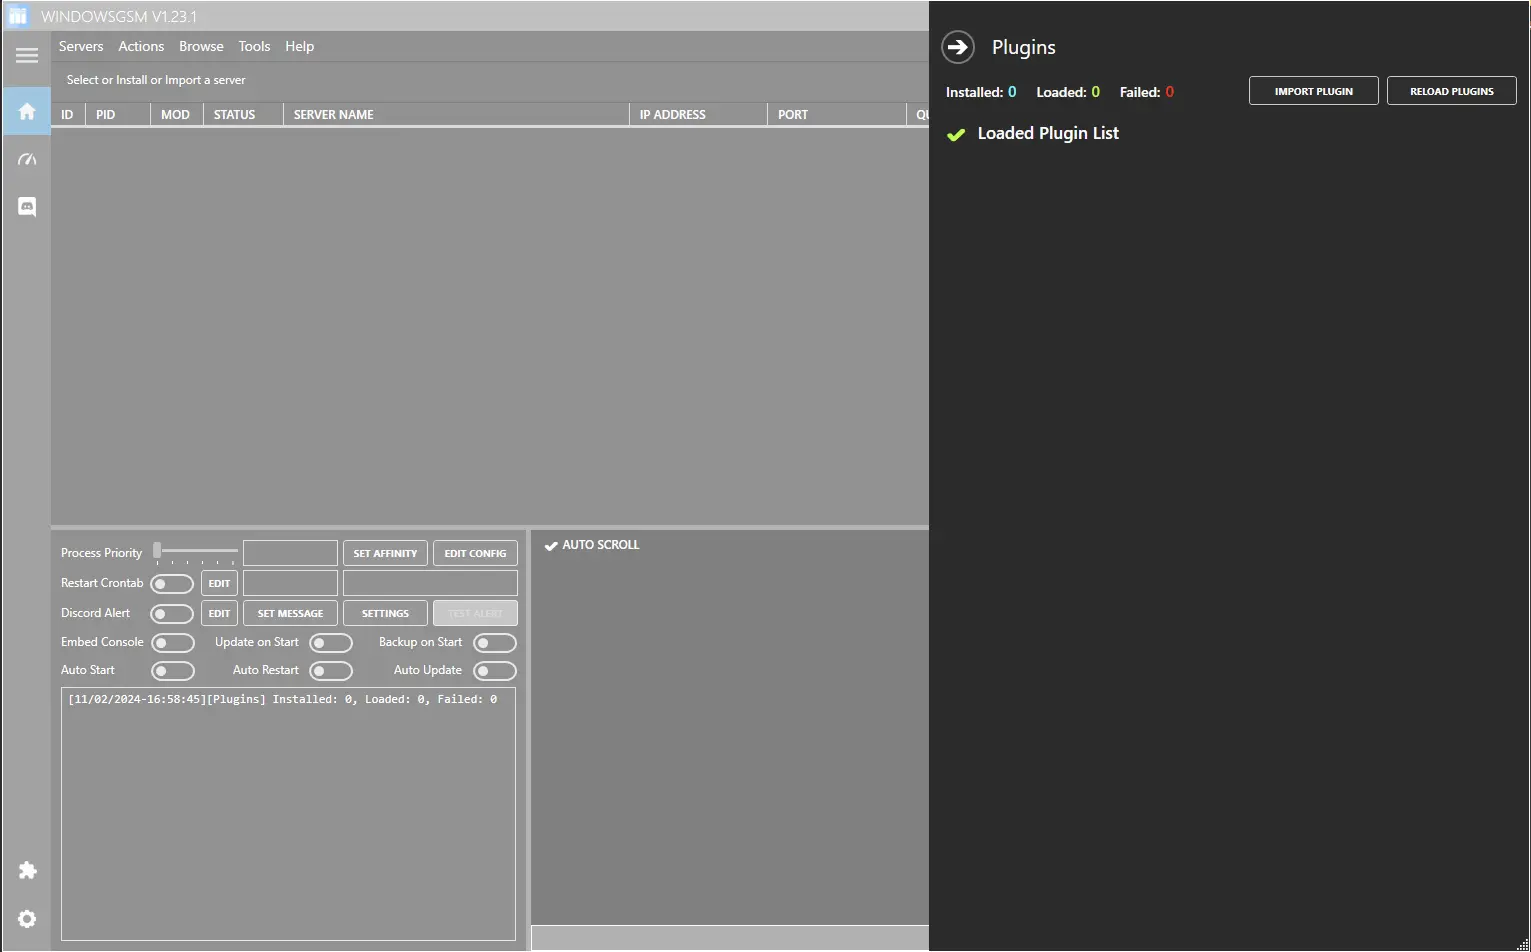
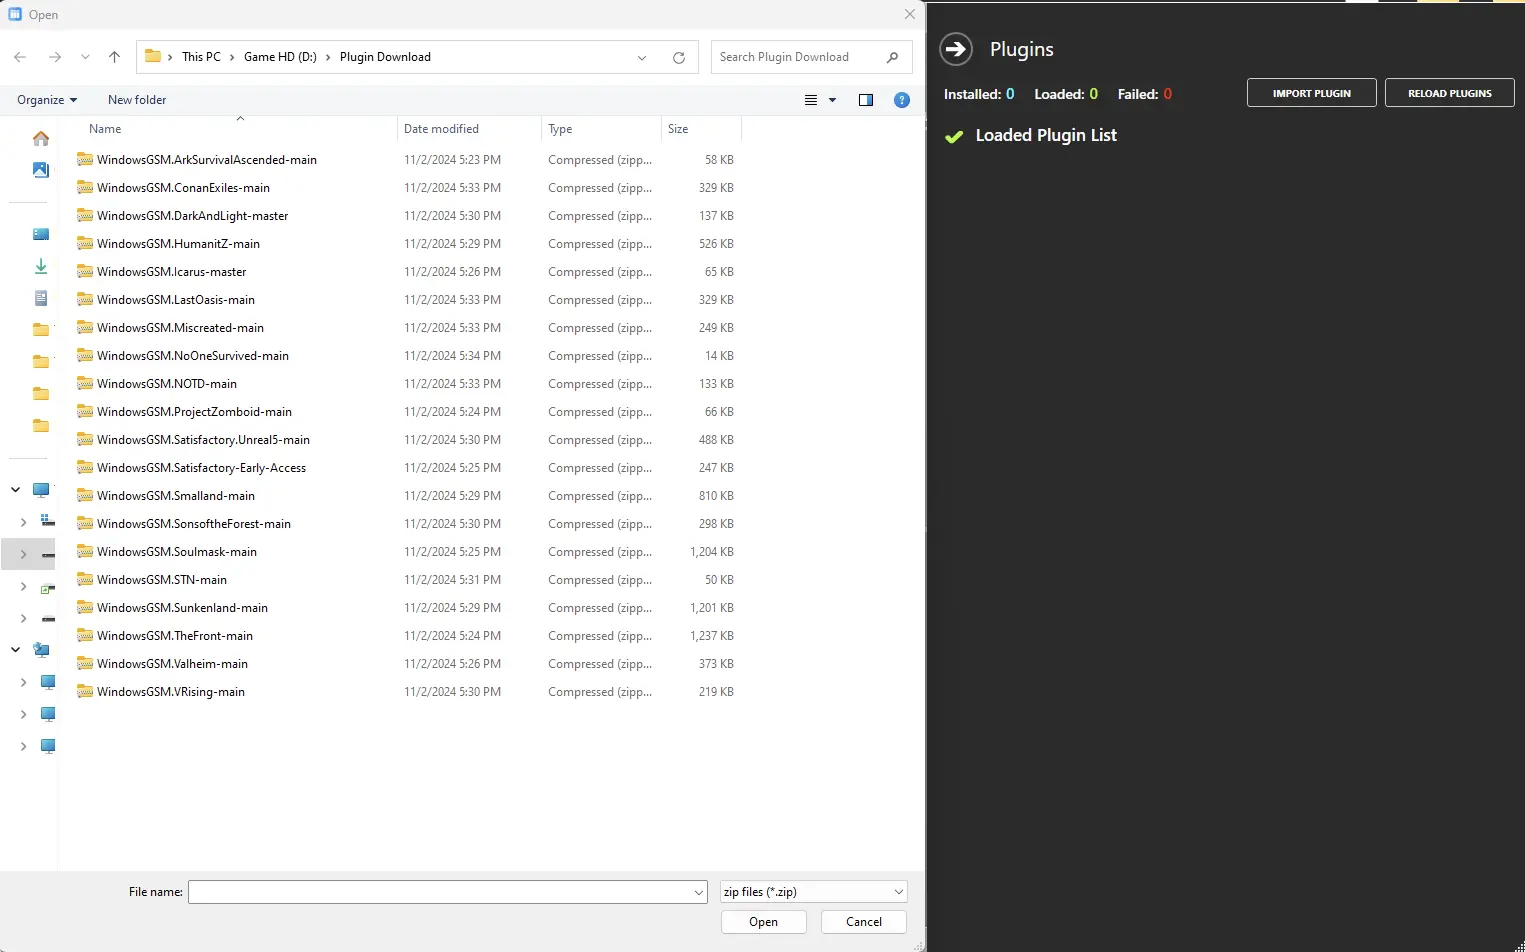
Click on the puzzle piece Icon, that will cause the plugin window to slide open. Next we will import the plugin. Simply click the import plugin button and a window will open up, navigate to where you downloaded the plugin file, select the zipped file, (do not unzip) and click open.
Step 3 Install the Server
Now that the plugin, (server setup instructions) are installed, we need to install the server.
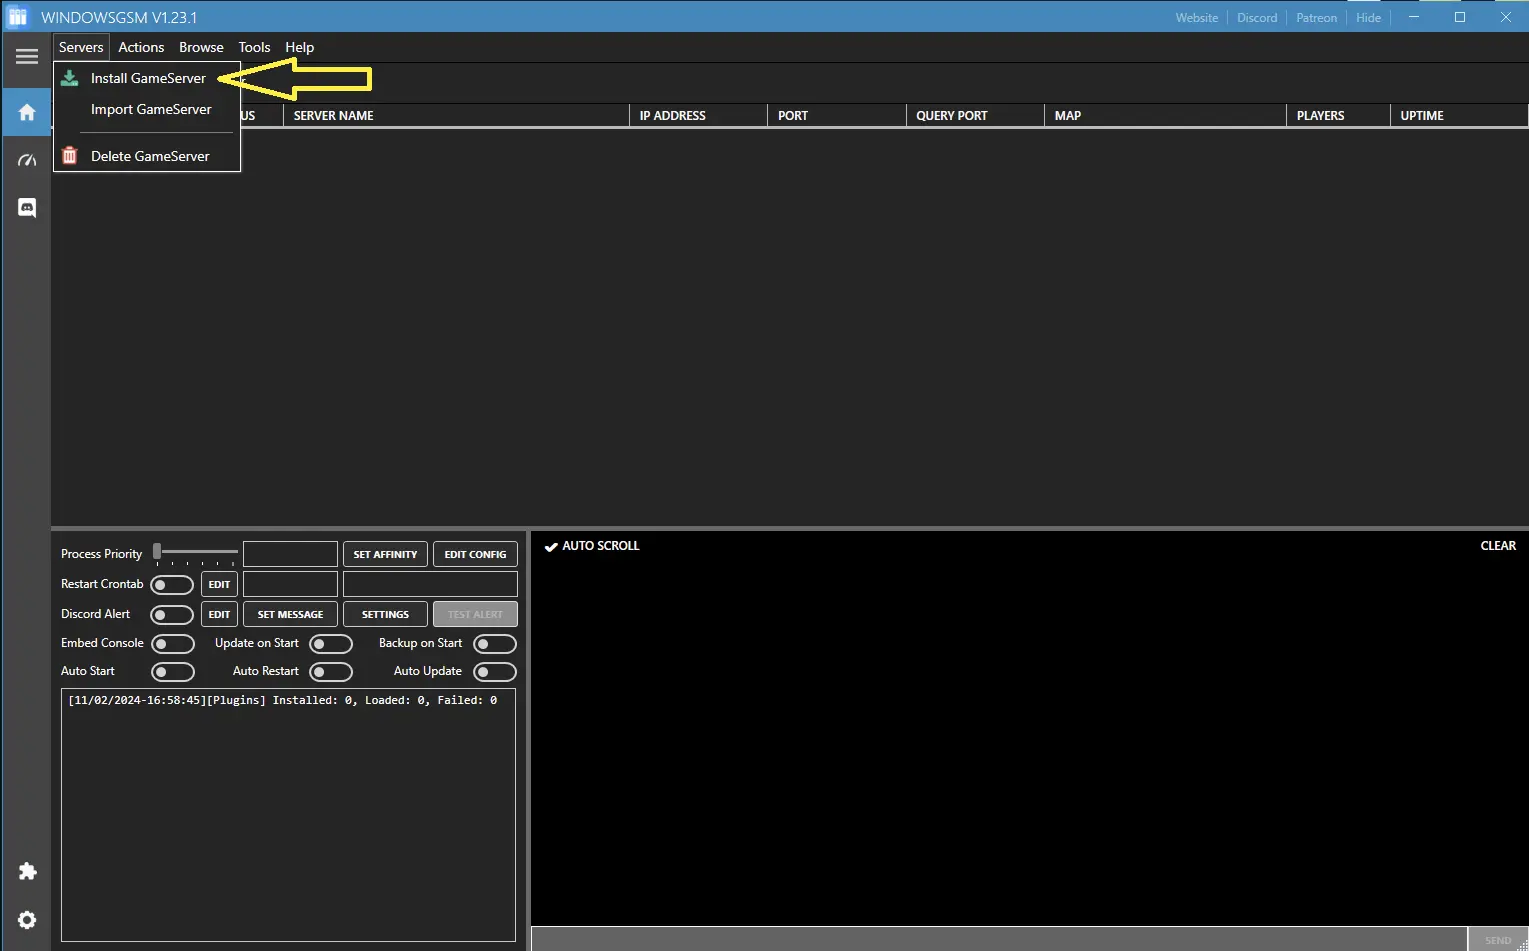
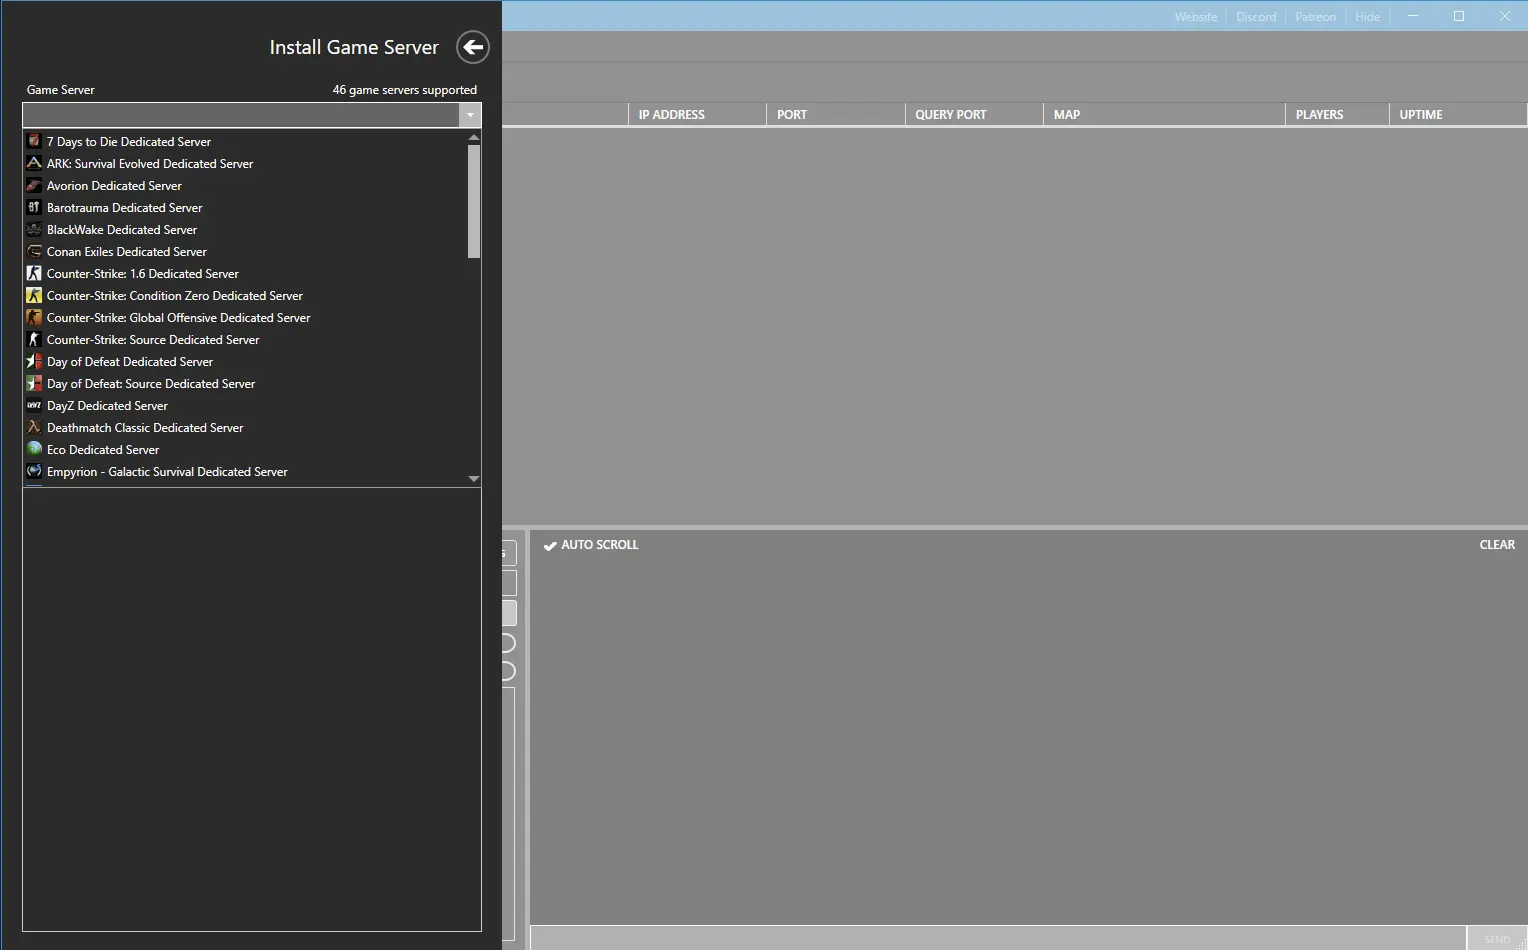
Click on install game server, and select your game from the list. After Selecting from the list, give the server a name, This is just the name that is shown inside WindowsGSM and not the actual name of the game server. This can also be changed later, but it is much easier to go ahead and change it now. Then click install and wait for your server to download and install.
Step 4 Open The Ports
You will need to open the following ports.
Open a port range of 16260-16265
If you don’t know how to forward ports in your router, this page should have everything you need. It is normally easy to do once you have a general understanding of what you are trying to accomplish and if you have the username and password to the router. See how to open ports HERE for more help.
Step 5 Server Configuration
This is the tricky part for this server, first in WindowsGSM you will want to go to
Browse\Server Files\then go up a level to folder Zomboid\Server
You are looking for the file Servertest.ini
You will need to edit the following.
- Public=True
- PublicName=my cool server
- Public Description=Must have text
- max players=lower than 16 (32 generates warning)
- Password=
- SteamVAC=False
- server_browser_announced=IP found when running Steam Query Tool
All other settings are optional/personal/server community preference.
Project Zomboid Configuration Settings
Project Zomboid has 400 options for configuration, I list the 1st 200 but for some weird reason I had certain settings will not copy paste, and to find the error I have to go line by line. The config file is easy enough to figure out once you locate it so for now this is all I will have listed.
Common Items
- Line 46 Default Port
- Line 49 UDP Port
- Line 55 Mods
- Line 66 Public=True
- Line 68 Public Name
- Line 72 Public Description
- line 76 Max Players
- Line 163 Password
- Line 188 SteamVac
# Players can hurt and kill other players
PVP=false
# Game time stops when there are no players online
PauseEmpty=true
# Toggles global chat on or off.
GlobalChat=true
ChatStreams=s,r,a,w,y,sh,f,all
# Clients may join without already having an account in the whitelist. If set to false, administrators must manually create username/password combos.
Open=true
# The first welcome message visible in the chat panel. This will be displayed immediately after player login. you can use RGB colours to chance the colour of the welcome message. You can also use <LINE> to create a separate lines within your text. Use: <RGB:1,0,0> This message will show up red!
ServerWelcomeMessage=Welcome to Project Zomboid Multiplayer! <LINE> <LINE> To interact with the Chat panel: press Tab, T, or Enter. <LINE> <LINE> The Tab key will change the target stream of the message. <LINE> <LINE> Global Streams: /all <LINE> Local Streams: /say, /yell <LINE> Special Steams: /whisper, /safehouse, /faction. <LINE> <LINE> Press the Up arrow to cycle through your message history. Click the Gear icon to customize chat. <LINE> <LINE> Happy surviving!
# Add unknown usernames to the whitelist when players join. Clients will supply their own username/password on joining. (This is for Open=true servers)
AutoCreateUserInWhiteList=false
# Display usernames above player’s heads in-game.
DisplayUserName=true
# Display first & last name above player’s heads.
ShowFirstAndLastName=false
# Force every new player to spawn at these set x,y,z world coordinates. Find desired coordinates at map.projectzomboid.com. (Ignored when 0,0,0)
SpawnPoint=0,0,0
# Players can enter and leave PVP on an individual basis. A player can only hurt another player when at least one of them is in PVP mode – as shown by the unobscured skull and crossbones on the left of the screen. When SafetySystem=false, players are free to hurt each other at any time if PVP is enabled.
SafetySystem=true
# Display a skull icon over the head of players who have entered PVP mode
ShowSafety=true
# The time it takes for a player to enter and leave PVP mode\nMinimum=0 Maximum=1000 Default=2
SafetyToggleTimer=2
# The delay before a player can enter or leave PVP mode again, having recently done so\nMinimum=0 Maximum=1000 Default=3
SafetyCooldownTimer=3
# Item types new players spawn with.\nSeparate multiple item types with commas.\nExample: Base.Axe,Base.Bag_BigHikingBag
SpawnItems=
# Default starting port for player data. If UDP, this is this one of two ports used.\nMinimum=0 Maximum=65535 Default=16261
DefaultPort=16261
# Minimum=0 Maximum=65535 Default=16262
UDPPort=16262
# Reset ID determines if the server has undergone a soft-reset. If this number does match the client, the client must create a new character. Used in conjunction with PlayerServerID. It is strongly advised that you backup these IDs somewhere\nMinimum=0 Maximum=2147483647 Default=517012147
ResetID=583051510
# Enter the mod loading ID here. It can be found in \Steam\steamapps\workshop\modID\mods\modName\info.txt
Mods=
# Enter the foldername of the mod found in \Steam\steamapps\workshop\modID\mods\modName\media\maps\
Map=Muldraugh, KY
# Kick clients whose game files don’t match the server’s.
DoLuaChecksum=true
DenyLoginOnOverloadedServer=true
# Shows the server on the in-game browser. (Note: Steam-enabled servers are always visible in the Steam server browser)
Public=true
# Name of the server displayed in the in-game browser and, if applicable, the Steam browser
PublicName=MYOS PJ
# Description displayed in the in-game public server browser. Typing \n will create a new line in your description
PublicDescription=myos test server
# Maximum number of players that can be on the server at one time. This excludes admins.
# WARNING: Server player counts above 32 will potentially result in poor map streaming and desync. Please advance with caution.\nMinimum=1 Maximum=100 Default=32
MaxPlayers=32
# Ping limit, in milliseconds, before a player is kicked from the server. (Set to 100 to disable)\nMinimum=100 Maximum=2147483647 Default=400
PingLimit=400
# After X hours, all containers in the world will respawn loot. To spawn loot a container must have been looted at least once. Loot respawn is not impacted by visibility or subsequent looting.\nMinimum=0 Maximum=2147483647 Default=0
HoursForLootRespawn=0
# Containers with a number of items greater, or equal to, this setting will not respawn\nMinimum=1 Maximum=2147483647 Default=4
MaxItemsForLootRespawn=4
# Items will not respawn in buildings that players have barricaded or built in
ConstructionPreventsLootRespawn=true
# Remove player accounts from the whitelist after death. This prevents players creating a new character after death on Open=false servers
DropOffWhiteListAfterDeath=false
# All forms of fire are disabled – except for campfires
NoFire=false
# If checked, every time a player dies a global message will be displayed in the chat
AnnounceDeath=false
# The number of in-game minutes it takes to read one page of a book\nMinimum=0.00 Maximum=60.00 Default=1.00
MinutesPerPage=1.0
Located Between Lines 101 and 200
# Loaded parts of the map are saved after this set number of real-world minutes have passed. (The map is usually saved only after clients leave a loaded area)\nMinimum=0 Maximum=2147483647 Default=0
SaveWorldEveryMinutes=0
# Both admins and players can claim safehouses
PlayerSafehouse=false
# Only admins can claim safehouses
AdminSafehouse=false
# Allow non-members to enter a safehouse without being invited
SafehouseAllowTrepass=true
# Allow fire to damage safehouses
SafehouseAllowFire=true
# Allow non-members to take items from safehouses
SafehouseAllowLoot=true
# Players will respawn in a safehouse that they were a member of before they died
SafehouseAllowRespawn=false
# Players must have survived this number of in-game days before they are allowed to claim a safehouse\nMinimum=0 Maximum=2147483647 Default=0
SafehouseDaySurvivedToClaim=0
# Players are automatically removed from a safehouse they have not visited for this many real-world hours\nMinimum=0 Maximum=2147483647 Default=144
SafeHouseRemovalTime=144
# Governs whether players can claim non-residential buildings.
SafehouseAllowNonResidential=false
# Allow players to destroy world objects with sledgehammers
AllowDestructionBySledgehammer=true
# Allow players to destroy world objects only in their safehouse (require AllowDestructionBySledgehammer to true).
SledgehammerOnlyInSafehouse=false
# Kick players that appear to be moving faster than is possible. May be buggy — use with caution.
KickFastPlayers=false
At Line 139 is server player ID Not shown here
# The port for the RCON (Remote Console)\nMinimum=0 Maximum=65535 Default=27015
RCONPort=27015
# RCON password (Pick a strong password)
RCONPassword=
# Enables global text chat integration with a Discord channel
DiscordEnable=false
# Discord bot access token
DiscordToken=
# The Discord channel name. (Try the separate channel ID option if having difficulties)
DiscordChannel=
# The Discord channel ID. (Use if having difficulties with Discord channel name option)
DiscordChannelID=
# Clients must know this password to join the server. (Ignored when hosting a server via the Host button)
Password=
# Limits the number of different accounts a single Steam user may create on this server. Ignored when using the Hosts button.\nMinimum=0 Maximum=2147483647 Default=0
MaxAccountsPerUser=0
# Allow co-op/splitscreen players
AllowCoop=true
# Players are allowed to sleep when their survivor becomes tired, but they do not NEED to sleep
SleepAllowed=false
# Players get tired and need to sleep. (Ignored if SleepAllowed=false)
SleepNeeded=false
KnockedDownAllowed=true
SneakModeHideFromOtherPlayers=true
# List Workshop Mod IDs for the server to download. Each must be separated by a semicolon. Example: WorkshopItems=514427485;513111049
WorkshopItems=
# Show Steam usernames and avatars in the Players list. Can be true (visible to everyone), false (visible to no one), or admin (visible to only admins)
SteamScoreboard=true
# Enable the Steam VAC system
SteamVAC=false
# Attempt to configure a UPnP-enabled internet gateway to automatically setup port forwarding rules. The server will fall back to default ports if this fails
UPnP=true
# VOIP is enabled when checked
VoiceEnable=true
# The minimum tile distance over which VOIP sounds can be heard.\nMinimum=0.00 Maximum=100000.00 Default=10.00
VoiceMinDistance=10.0
# The maximum tile distance over which VOIP sounds can be heard.\nMinimum=0.00 Maximum=100000.00 Default=100.00
VoiceMaxDistance=100.0
Read These First
WindowsGSM
Troubleshooting
Did you find this all a little too much? You can also host this game from GPortal, Paying for hosting has advantages and disadvantages, you can read about those HERE. IF you decide to use paid hosting, friends of the site get 10% off and it helps support me.

