How to Install Ark Survival Ascended Dedicated Server using ASADedicated Manager
Dedicated Server Managers, Handle the Management.
Dedicated server managers are easy to have a love hate relationship with. On the one hand they seem extremely overwhelming especially if you are new and don’t really even understand what is going on or what you are looking at. It appears at first glance you just have a million places to break things. Once you start to install a few game servers and see that they are not really that complicated, you can really appreciate a manager like Ark Survival Ascended Dedicated Server Manager. They essentially simplify the process, that is once you understand it.
We assume you have already read the in’s and out’s of running your own server, things like the monthly costs, the hardware, and leaving your computer up 24/7. If you have not I recommend starting with this quick read, It can save you hours of time and frustration.
How to Install Ark Survival Ascended Dedicated Server Manager
I have found yet another server manager, This one is for Ark Survival Ascended. I did not create this manager, however, whenever I find an excellent resource that will help my fellow survivors I try to get the information out there. If you have trouble with this program or have questions you can contact the developer and seek help on the forums, and as always I will help in my discord channel when I am available.
Here is a link to the owners read
ASA Dedicated Server Manager Prerequisites
- Operating System: Your system must be running on a 64-bit Windows operating system. This is essential for the proper functioning of the ASA Dedicated Server Manager.
- .NET Framework 4.8 or Higher: The .NET Framework 4.8 or a more recent version must be installed on your system. If it’s not already installed, you can download and install it from the provided link: Download read
- Internet Access: An active internet connection is required for various functionalities of ASA Dedicated Server Manager, including downloading updates and accessing online resources.
Step 1 Download and Install the Files.
Download the file, the file is a zip file so you will need a program to unzip it unless you are using windows 11, which has a built in zip program (finally).
You can find ASADedicated Manager read On the creators webpage.
Make a folder to unzip the files too. You can do this on any drive you want to, I chose to do it on the drive I make my servers on.
Unzip the files to the folder you just made.
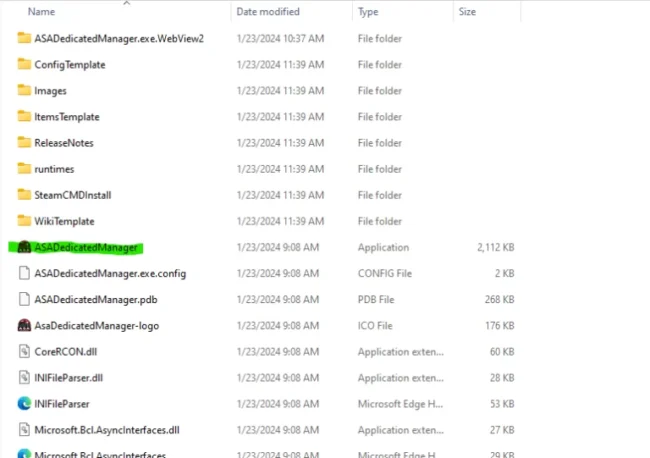
Example C:/ASADedicatedManger_Releases-main. Find the ASADedicatedManger.exe and double click it to run.
Step 2 Setup the Profile
Setup a profile. When you click on your new desktop shortcut it will ask you to setup a profile.
This profile is your install path, I HIGHLY recommend naming the path after the map you are using. Later when more maps are released, we will be able to link them together and this will keep things nice and easy. It will also let you have a separate mod map, that doesn’t get confused with your stock map. Once you have selected a location you are happy with simply hit install server and the rest will be handled for you.
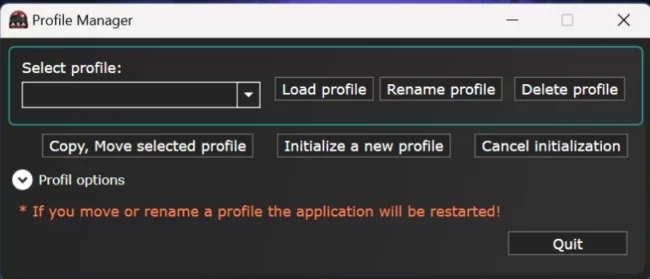
This can be very confusing, it does not work exactly the way I would expect.
- Here Click Initialize a new profile
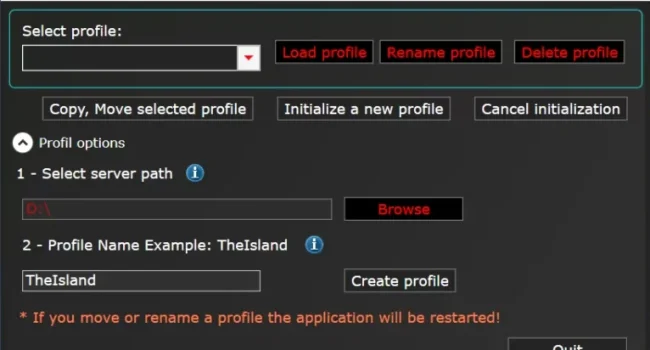
Select an install path, You will have to browse, and it will show up in red. This does not mean something is wrong. That is simply how the creator decided to do it. Name the profile, I suggest using the map name, it will come in handy later when you link maps.
- Select a Path
- Name the Profile
- Create Profile (click button).
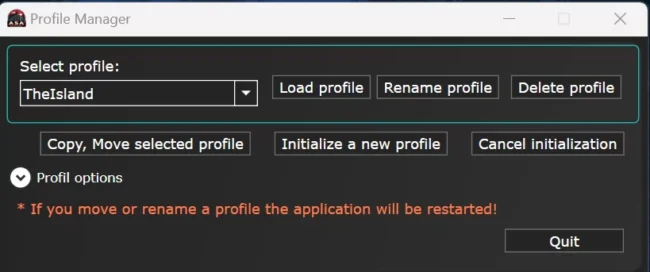
Now select the profile you just created and select LOAD profile and move along to the next screen.
NOTE: You will get an error that no profile is found, it is not an error really, because we have not yet installed a server. This window will close and the following window will open.
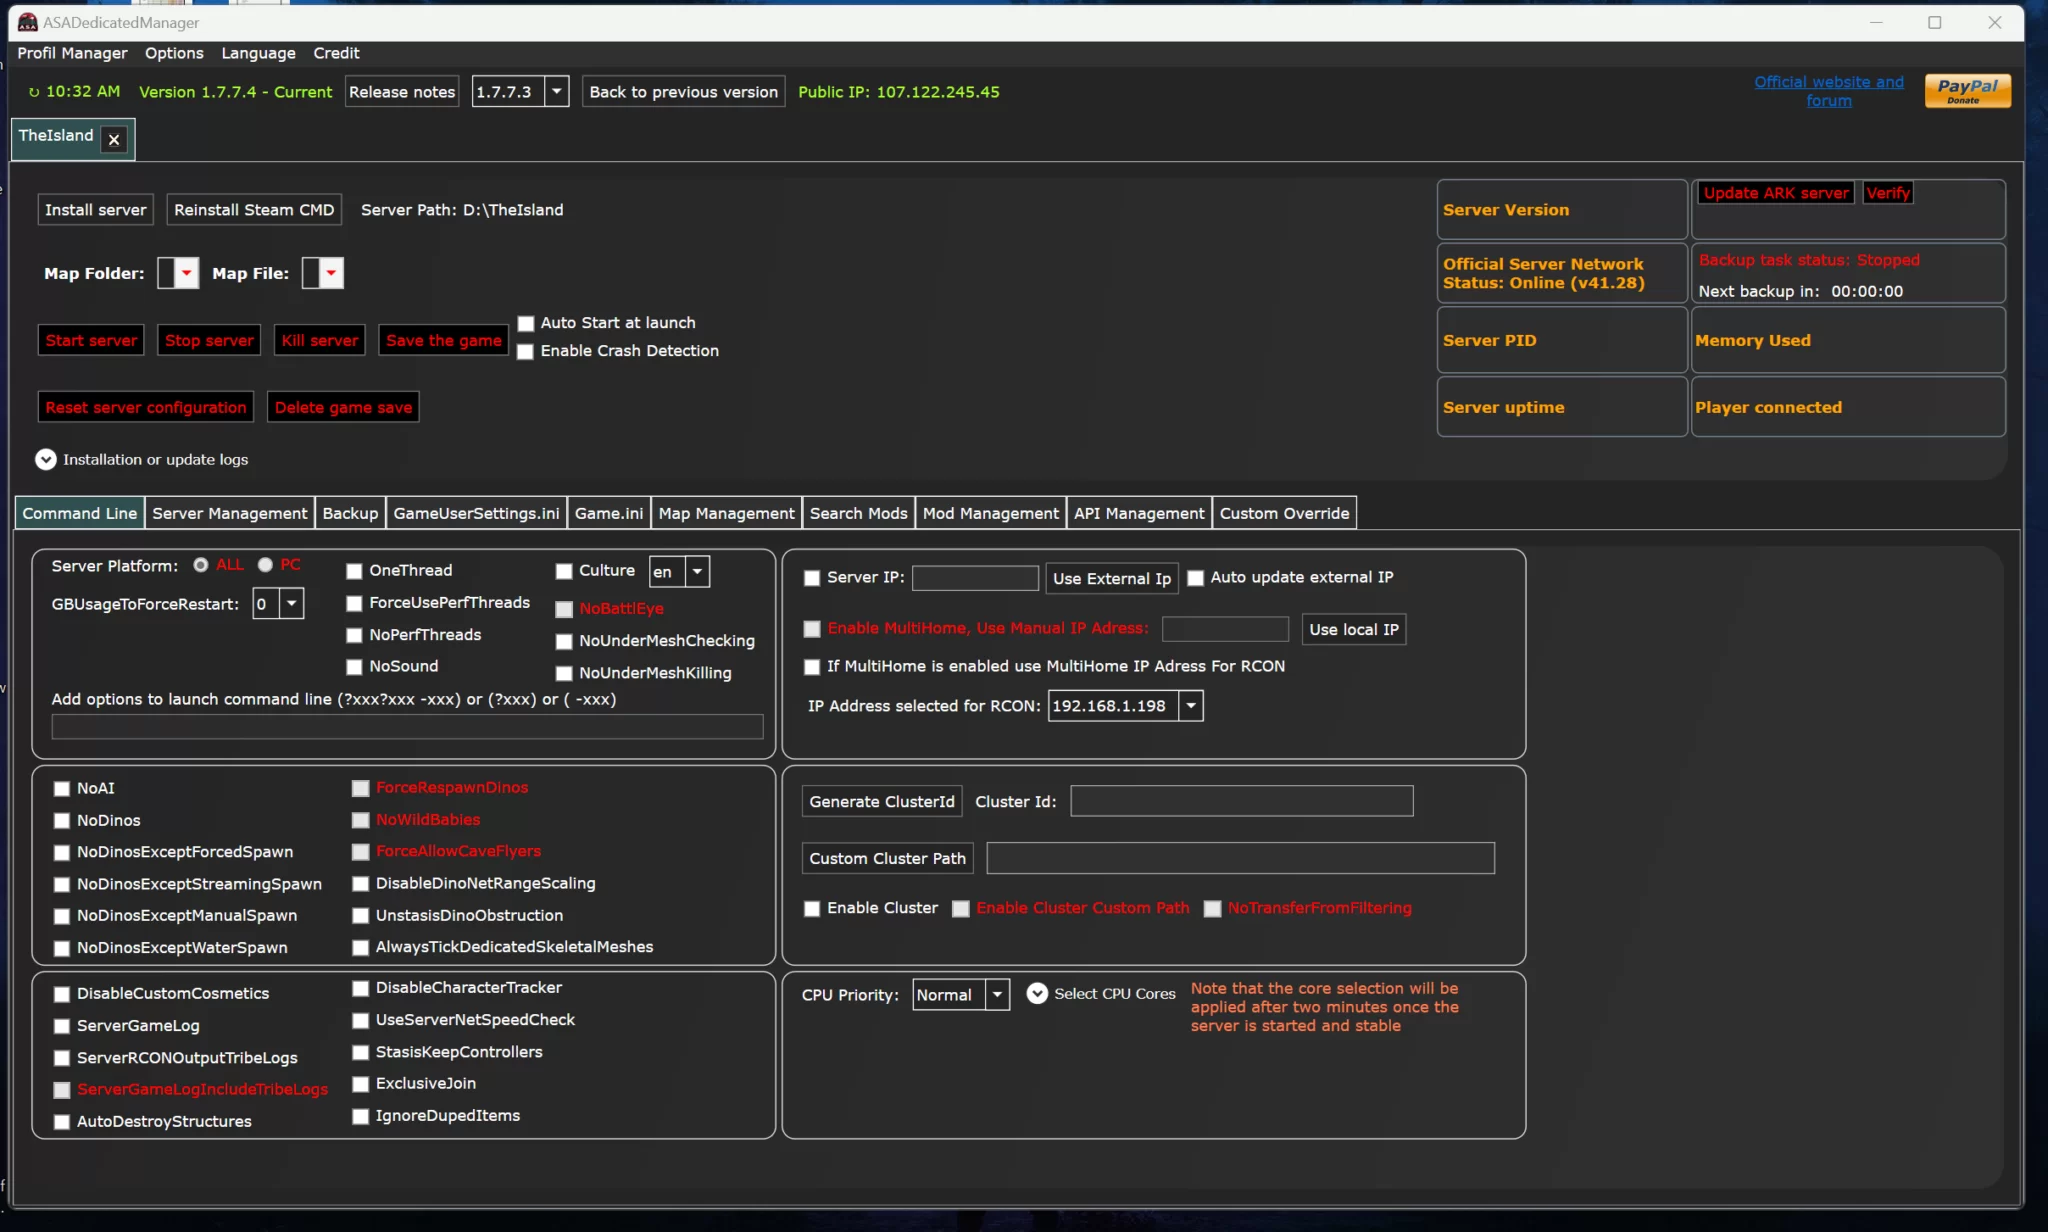
Step 3 Install the Server and Set the IP.
Select install server and wait, the server will download the steamcmd files along with the Ark Survival Ascended Server files and when it is complete the upper window will automatically minimize.
Note: The Map Folder and Map File may display maps in Red. This is normal, and once again nothing is wrong. You simply have not installed your server yet.
On the bottom half of the first screen you will need to set your IP. You will want to use the “external IP button, it will automatically load the correct IP address to share your server. IF you are playing internally on a LAN, that your local server IP may need to be put in here.
Next make your way over to the GameUserSettings.INI tab. We will want to setup a couple of things here real quick.
- Set your password
- Set your session ID (sever name)
- Set your Ports
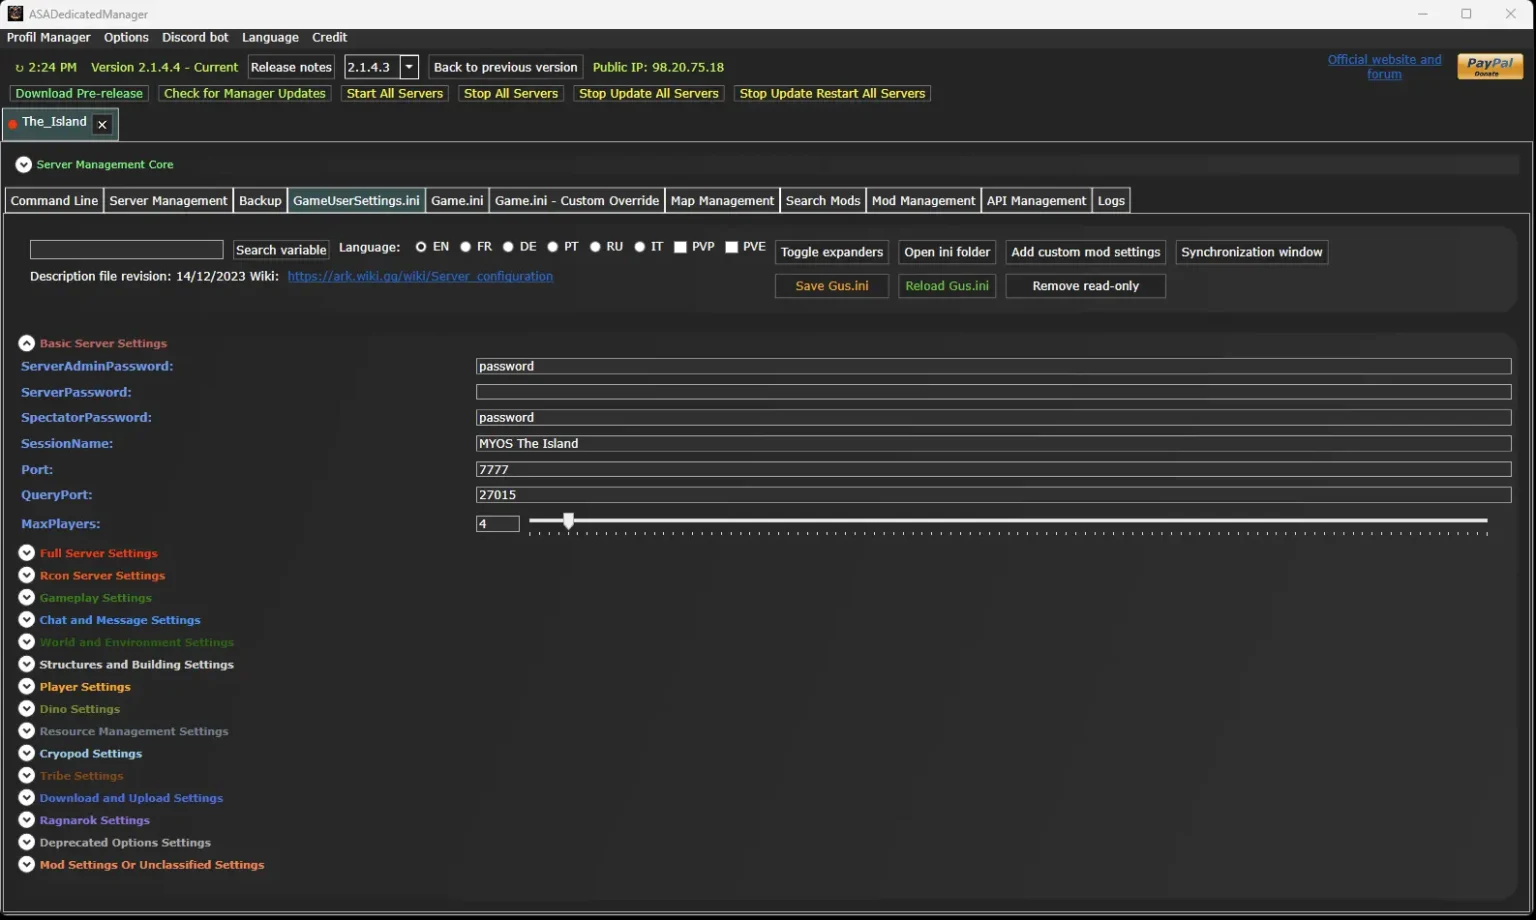
Step 4 Set Your Ports
You will need to open ports in your router. I open a range of ports because with every map release you will need more ports if you want to run more than one map at the same time. This is an easy way to transport tames and items from one map to another.
Port Ranges
- 7775-7800
- 27015-27030
If you don’t know how to forward ports in your router, this page should have everything you need. It is normally easy to do once you have a general understanding of what you are trying to accomplish and if you have the username and password to the router. See how to open ports HERE for more help.
Step 5 Start Your Engines!
Now simply start the server, let it run 3-10 minutes to make sure it is fully loaded, then stop it. I do this because Ark Survival Ascended Server is very quirky and often times does not load correctly/fully on the first startup. This has to do with the server itself not the server manager.
You likely wont have to put anything in the command line. When you fill in the other aspects of the server, it will build the command line accordingly. This command box is for commands not otherwise handled with the ASA server manager.
Make sure your server is up and running with no mods, and no major changes, this will make it much easier to troubleshoot in the event that you have problems.
Once you have verified your stock server is up and running
MESS WITH STUFF!
One of the best things about the ASA Dedicated Server Manager is all the normal adjustments you want to make are broken out really nice in catergories under Game and GameUserSettings. You will need to look around a bit still but its very easy to make changes – just don’t forget to hit save. I have listed just a few settings below to give you an idea of where to find things.
Common things to change
Under the Game Tab
Player Settings
- GenericXPMultiplier
- PlayerHarvestingDamageMultiplier
World Settings
- BUseSinglePlayerSettings
Dino Settings
- DinoHarvestDamageMultiplier
GameUserSettings
- Gameplay Settings
- Difficulty Offset
- OverrideOfficialDifficulty
- serverPVE
- ShowFloatingDamageText
For a full list of all configuration settings go read.


