Server Manager
Welcome to our guide on setting up a The Forest dedicated server, whether you are looking to set up a server for your own personal use or a The Forest dedicated server for a larger community to enjoy. Playing multiplayer games on a self-hosted or dedicated server offers players a unique and customizable gaming experience. By setting up their own server, players have the freedom to create their own rules, mods, and gameplay options, leading to a more personalized and immersive gaming experience. By following our step-by-step instructions, you will be able to quickly and easily set up your own The Forest self hosted server and start playing with friends or fellow gamers in no time. So, let’s get started and create the ultimate gaming experience with your very own The Forest server!
We assume you have already read the in’s and out’s of running your own server, things like the monthly costs, the hardware, and leaving your computer up 24/7. If you have not I recommend starting with this quick read, It can save you hours of time and frustration. I also assume you have already installed WindowsGSM, but if you haven’t start with that HERE.
You can also host this game from GPortal, Paying for hosting has advantages and disadvantages, you can read about those HERE. IF you decide to use paid hosting, friends of the site get 10% off and it helps support me.
Step 1 Find the Server Instructions
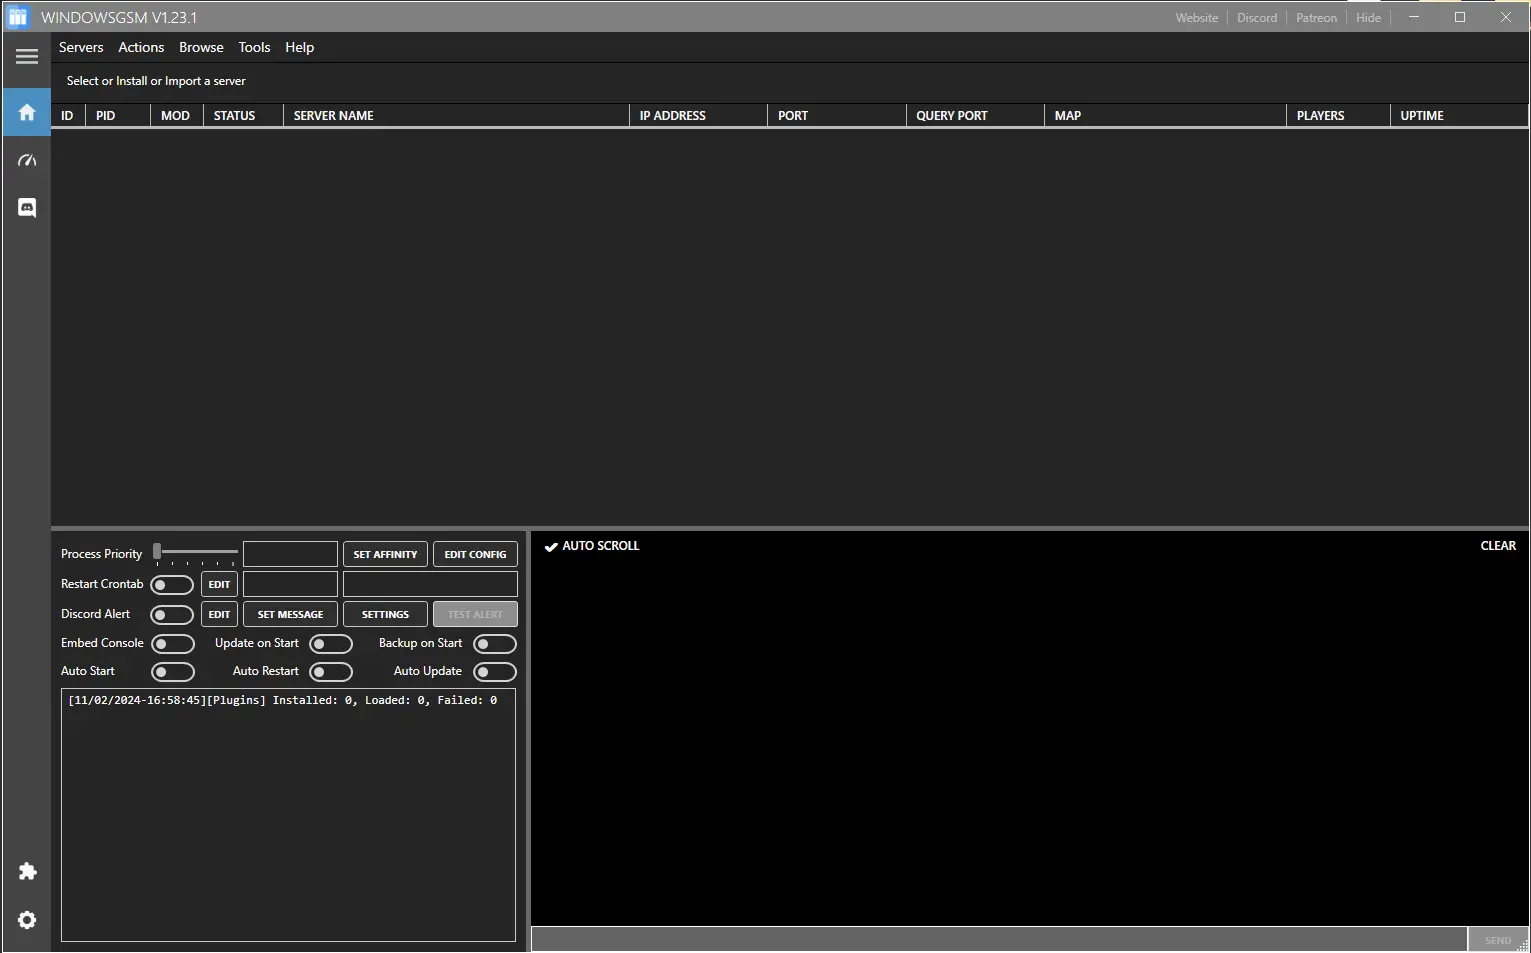
First you need to find your server instructions. Some of the server instructions are built into WindowsGSM and do not require a plugin. Since new games are released all the time many games are not built into WindowsGSM and do require a plugin. The plugin is simply instructions for WindowsGSM to find the server on Steam and install the server inside of WindowsGSM. There are dozens of server plugins that are available for your use, If it is a brand new game you can request a plugin in WindowsGSM Discord. You can find a list of all the dedicated server plugins quite easy on the WindowsGSM website. All of the plugins on that site link out to GitHub. But Alas, this game is already built into WindowsGSM server list and doesn’t require a plugin!
Step 2 Install the Server
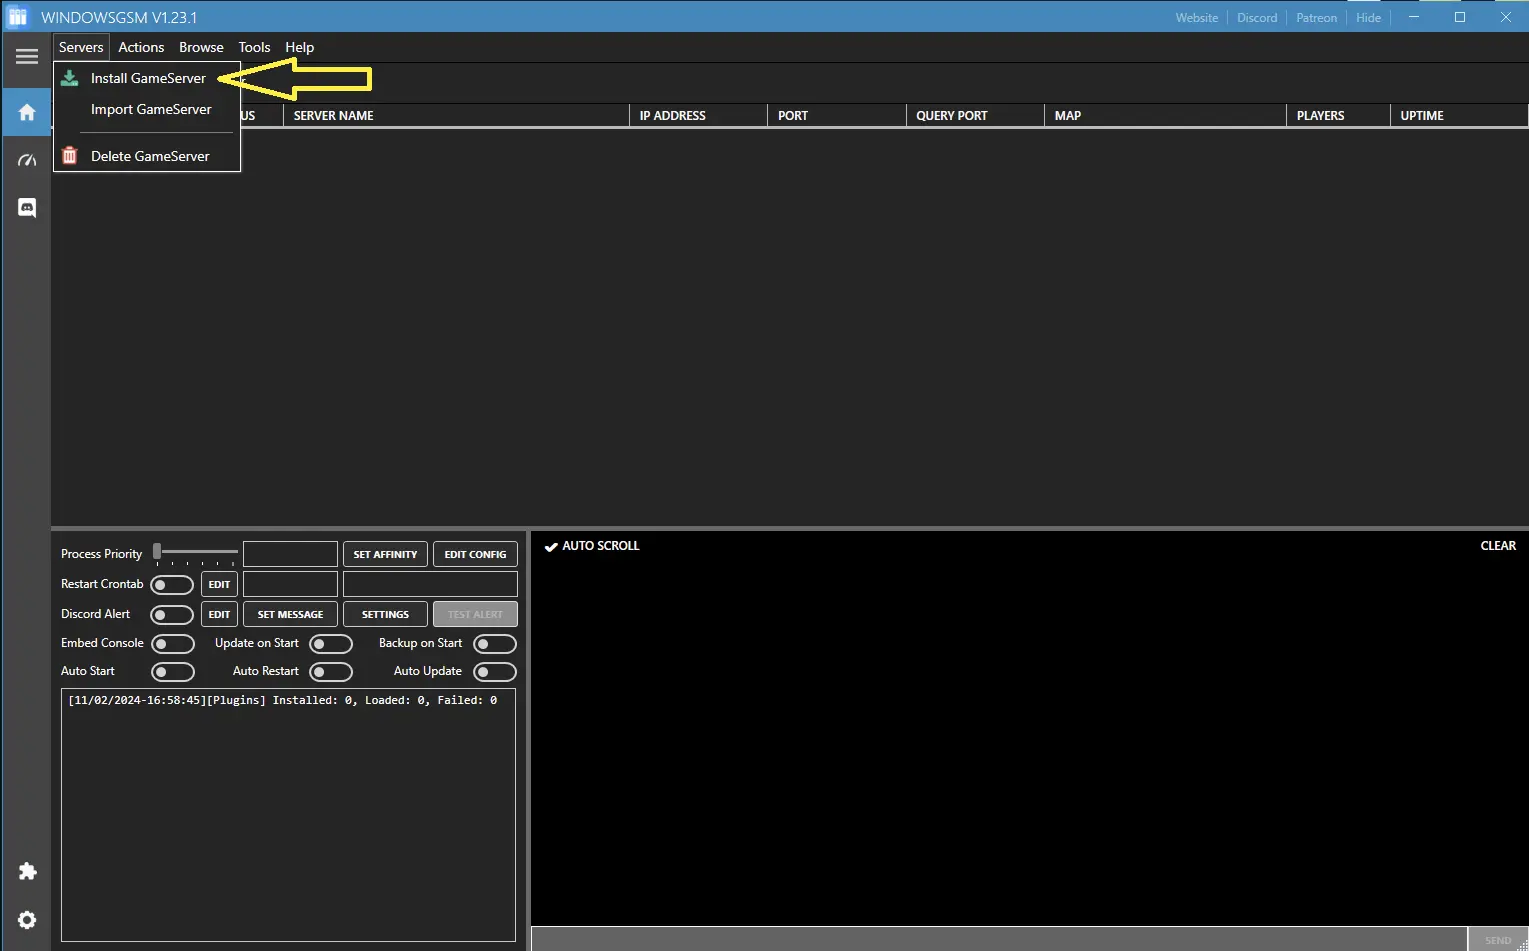
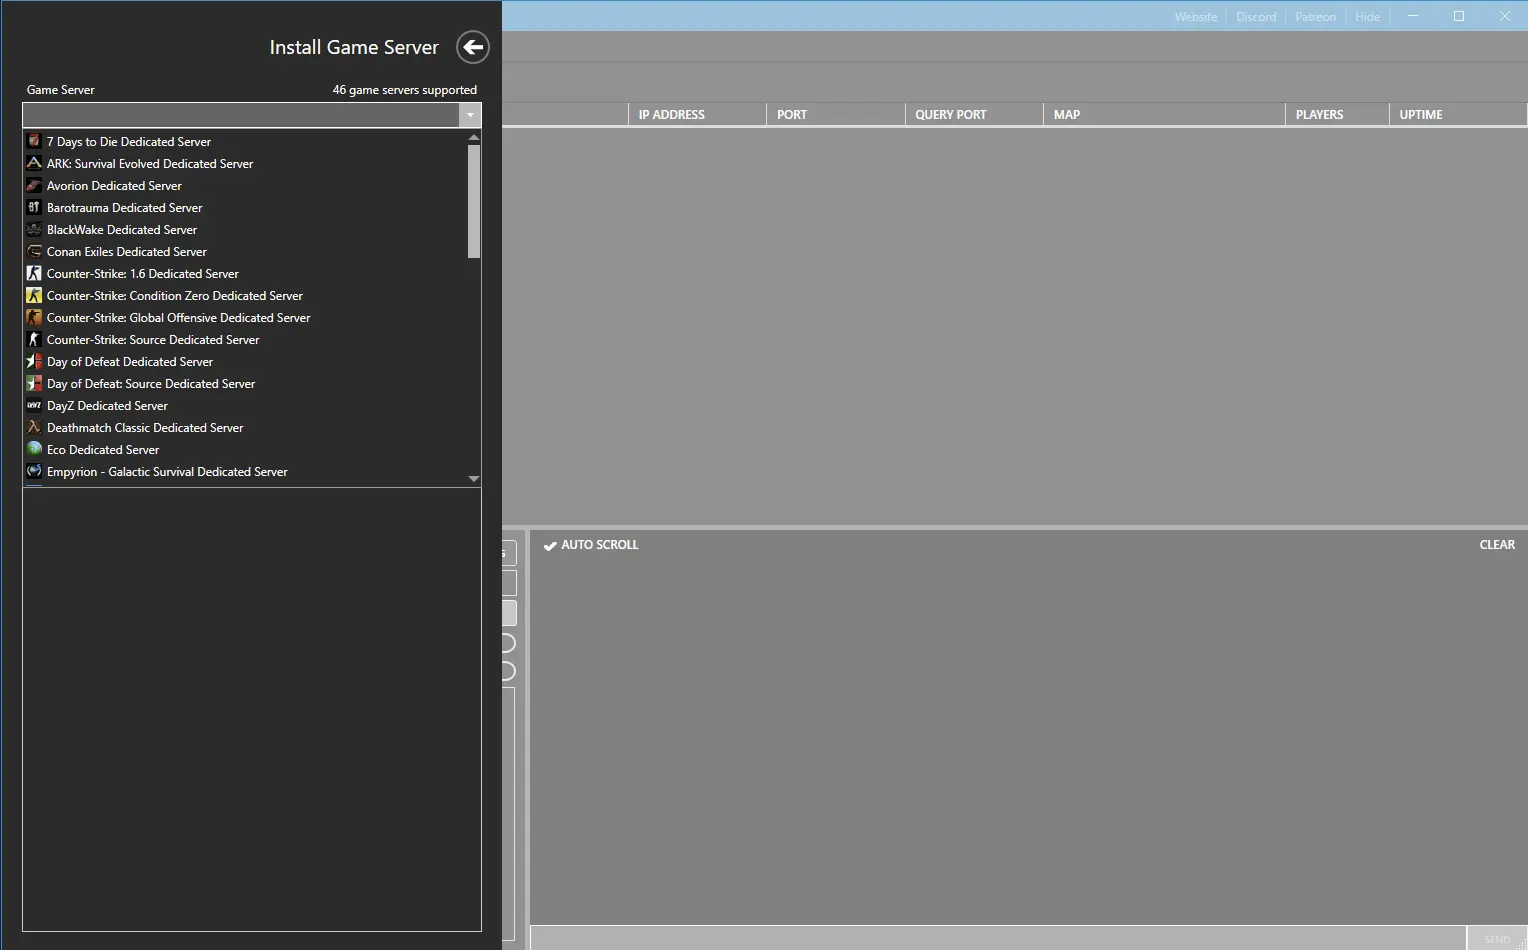
Click on install game server, and select The Forest from the list. After Selecting from the list, give the server a name, This is just the name that is shown inside WindowsGSM and not the actual name of the game server. This can also be changed later, but it is much easier to go ahead and change it now. Then click install and wait for your server to download and install.
Step 3 Server Configuration
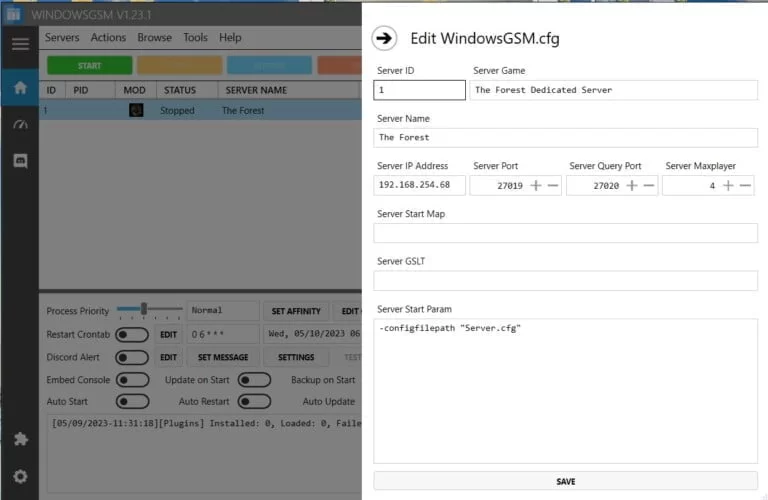
Select the server, click the edit config button and this window will open up, under Server Star Param, Copy and paste the following code and change the name, to the server name you want listed.
-configfilepath “Server.cfg” -serversteamport 8766 -servername survivalgamingclub
Time to Open Some Ports
You will need to open the following router ports in order to connect to your server.
- 8766 Steam Communication Port
- 27015 Game Communication Port
- 27016 Steam Query Communication Port
If you don’t know how to forward ports in your router, this page should have everything you need. It is normally easy to do once you have a general understanding of what you are trying to accomplish and if you have the username and password to the router. See how to open ports HERE for more help.
Step 4 Configuring Your Dedicated Server
At the top of Windows Server Manager under Browse / Server Files, which opens windows file explorer and automatically locates your server files.
There is a file called, wait for it, SERVER. Right Click and edit this file with notepad or notepad+
As always I recommend using Note++ to edit any config file.
Note: Other than the name change most people probably won’t have to change any of these settings.
Server Options
You can change the following settings on your server
allowBuildingDestruction on | Allow building destruction. Options are allowBuildingDestruction on or allowBuildingDestruction off |
allowCheats on | Allow clients to use the built in debug console. This only disables Note++, it has no effect on mods such as the Ultimate Cheat Menu. People can still grief your game. Options are allowCheats on or allowCheats off. |
allowEnemiesCreativeMode off | Allow enemies in creative games. Options are allowEnemiesCreativeMode on or allowEnemiesCreativeMode off. |
configfilepath | Changes the config file path used by the server |
difficulty HardSurvival | Game difficulty mode. Must be set to Peaceful / Normal / Hard / HardSurvival |
enableVAC off | Enable VAC (Valve Anti-cheat System at the server. Options are enableVAC on or enableVAC off. |
initType Continue | Must be set to New or Continue. If left on New, the game won’t save and you will have to restart each time. |
realisticPlayerDamage off | Realistic Player Damage (On/Off), this allows the game to be more PvP based. Damage to other players will be increased dramatically, depending on the weapon. |
resetHolesMode off | Reset all structure holes when loading a save. These are holes caused by the Note++. This has the same effect as the woodpaste command. Options are resetHolesMode on or resetHolesMode off |
saveFolderPath | Allows defining a custom folder for save slots, leave empty to use the default location. |
serverAutoSaveInterval 30 | Time between server auto saves in minutes – The minimum time is 15 minutes, the default time is 30. |
serverContact | Contact email for server admin. Not required. |
serverGamePort 27015 | Game Communication Port – Note: If you have a router you will need to open this port. |
serverIP | Server IP address – Note: If you have a router, this address is the internal address, and you need to configure ports forwarding. Don’t use your global IP address. |
serverName | Server display name. How it is seen in the game lobby. |
serverPassword | Server password. Blank means no password. It is recommended to have a password to prevent griefers. |
serverPasswordAdmin | Server administration password. Blank means no password. |
serverPlayers 8 | Maximum number of players, default is 8. |
serverQueryPort 27016 | Query Communication Port – Note: If you have a router you will need to open this port. |
serverSteamAccount | Don’t leave this blank or use your actual Steam account name. You can obtain an ID number here. The Forest App ID number is 242760. DO NOT SHARE THIS CODE! |
serverSteamPort 8766 | Steam Communication Port – Note: If you have a router you will need to open this port. |
showLogs on | Show event log. Must be set off or on. It is highly recommended to leave this on, this will show if your server is working or not and what issues you may be having, if any. Options are showLogs on or showLogs off. |
slot 1 | Slot to save the game. Must be set to either slot 1 / slot 2 / slot 3 / slot 4 / slot 5. |
targetFpsActive 60 | Target FPS when there is at least one client connected. |
targetFpsIdle 5 | Target FPS when no client is connected. |
treeRegrowMode off | Regrow 10% of cut down trees when sleeping. Options are treeRegrowMode on or treeRegrowMode off |
veganMode off | No enemies if switched off. Options are veganMode on or veganMode off. |
vegetarianMode off | No enemies during day time. Options are vegetarianMode on or vegetarianMode off. |
In Game Commands
/help | Provides you with a help menu of all the known commands |
/save (slot number 1-5) | Saves the game on the chosen slot number. Be careful as it may save over another game in your dedicated server save folder |
/restart | Restarts the server, resets save game (WARNING: SAVE DATA WILL BE DELETED) |
/shutdown | Shuts down the server, unknown if it will save prior |
/ban (steam id) | Bans the user, REQUIRES MORE INFORMATION |
/kick (steam id) | Kicks the user, REQUIRES MORE INFORMATION |
/treeregrowmode | Regrow 10% of cut down trees when sleeping. Options are treeRegrowMode on or treeRegrowMode off |
/allowbuildingdestruction | Allow building destruction. Options are allowBuildingDestruction on or allowBuildingDestruction off |
/allowenemiescreative | Allow enemies in creative games. Options are allowEnemiesCreativeMode on or allowEnemiesCreativeMode off. |
/openlogs | REQUIRES INFORMATION |
/closelogs | REQUIRES INFORMATION |
